Overview
Mango’s use of runtime loading modules can be confusing for Eclipse developers until they understand how classes are loaded by Mango.
Note: These instructions are specifically for OSX but will be similar on Windows.
Runtime changes can be made while Mango is running to most classes (including module code) as Eclipse will hot-swap the changes into the running JVM.
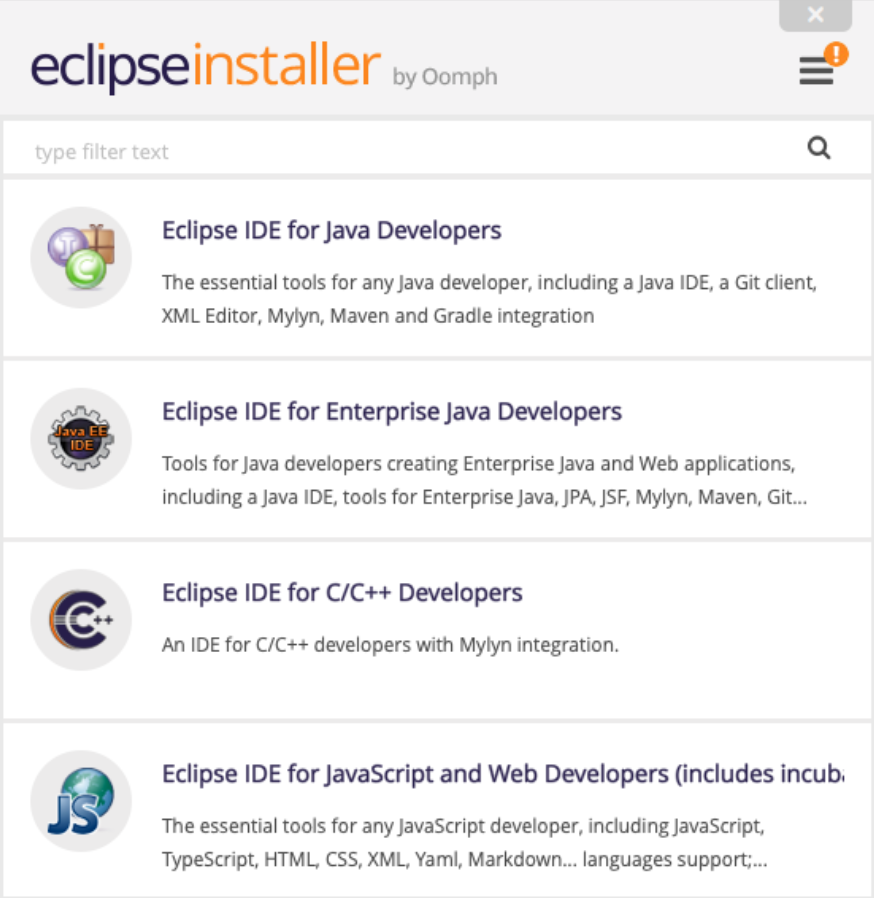
Download Eclipse
Download and install the eclipse package for Java Developers here:
Download Java JDK Latest
Get the latest JDK from Adopt https://adoptopenjdk.net:
Add Git Repositories
Git configuration
Please add this to your global gitconfig
[branch]
	autosetuprebase = always
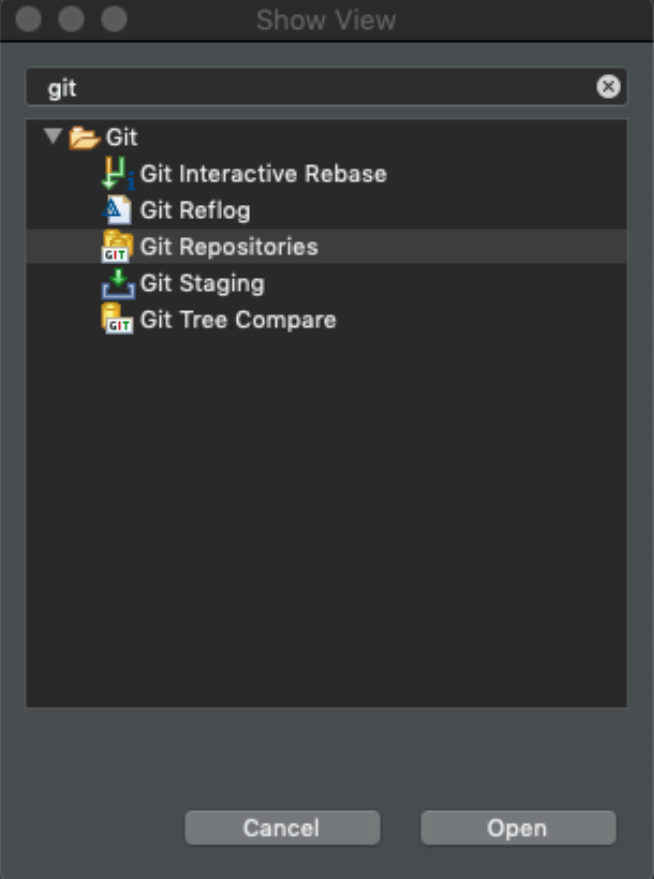
Git repositories
First show the git repositories view. Window → Show View…
Then copy and paste these git repo URLs into the view window to connect to the repository. You may not have access/or need all these repos so only import what you need.
- ma-core-public
- ma-core-private
- ma-modules-public
- ma-modules-private
- ma-modules-proprietary
- ma-dashboards
- dashboards
When importing the repositories place them on your file system in this structure, this is necessary for the build process to work properly.
- git/infiniteautomation
- /ma-core-public
- /ma-core-private
- /ma-modules-public
- /ma-modules-private
- /ma-modules-proprietary
- /ma-dashboards-public
- /dashboards-public
Configure Eclipse
Setup Memory settings
Open the Eclipse app by right click and ‘show package contents’ edit the eclipse.ini file and add/replace the memory settings with this:
-Xms256m
-Xmx8024m
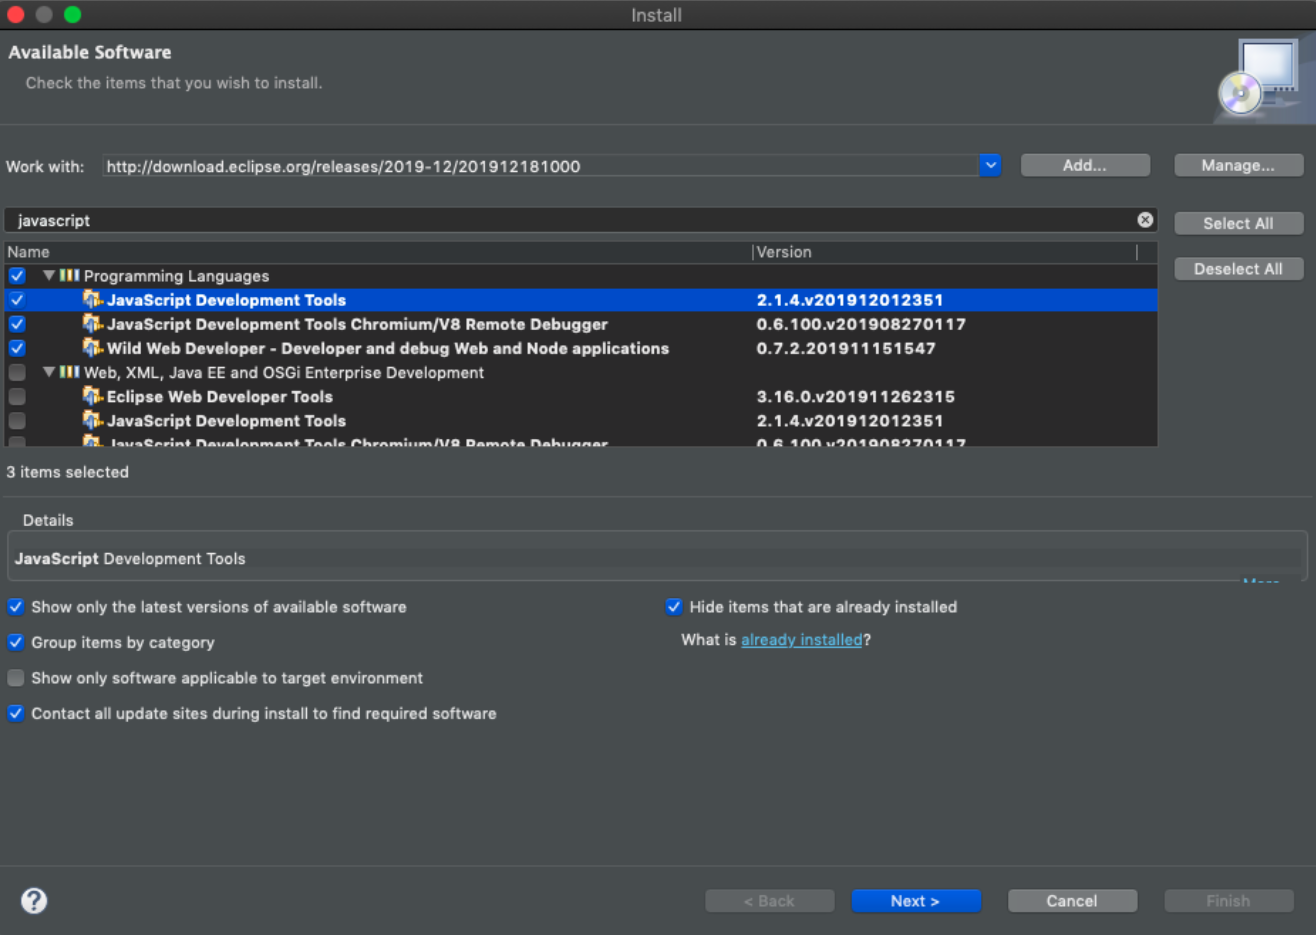
Install Javascript Development Tools
Help → Install new software...
Install JSHint
https://github.eclipsesource.com/jshint-eclipse/updates/
Setup Code Style/Format
Java Code Style
If you are using another IDE, we are using the Google Java style guide with indentation of 4 spaces. There are various setting files for other IDEs here.
- Preferences → Java → Code Style → Formatter
- Click Import...
- Import the code style from here as an XML file.
- Setup auto formatting
Javascript Code Style
If you are using another IDE, we are using the AirBNB ES6 style guide with indentation of 4 spaces.
- Preferences → JavaScript → Code Style → Formatter
- Click Import...
- Import the code style from here as an XML file.
- Install JSHint from here
- Preferences → JSHint→ Configuration
- Use this JSHint configuration from here
Installed JREs
Preferences → Java → Installed JREs
Make sure the JDK is selected in this menu. At this point you can install other JDKs to choose from while testing and developing.
Setup Maven Inside Eclipse
Configuring
MA_HOMEis only required if you wish to use the install-module profile to copy a built module.zip file into your core's web/modules directory. It is not used for building the core bundle anymore. You can also set aMA_HOMEenvironment variable instead.
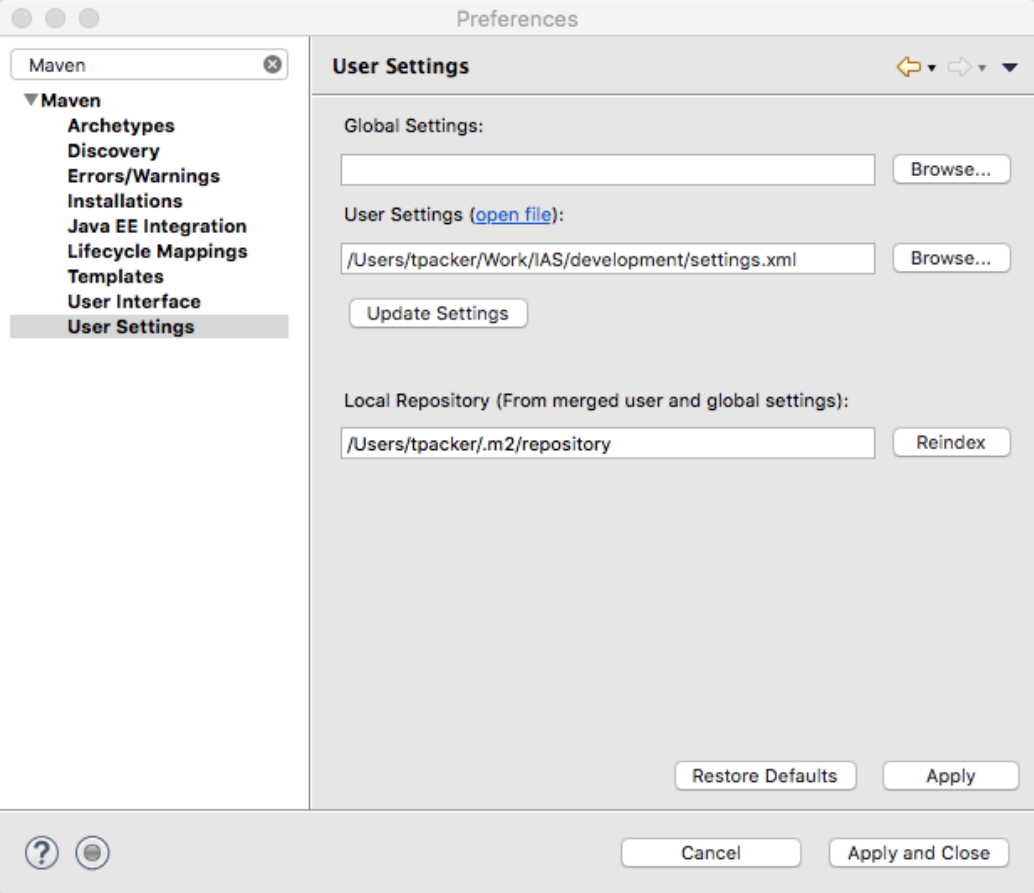
- Create a settings.xml file (see example below)
- Go to Preferences → Maven → User Settings
- Point the User Settings: to new settings file, this will activate the set-ma-home profile that will set MA_HOME for the builds.
- Click the ‘Update Settings’ button to pick up the changes.
Example User Settings file:
<settings xmlns="http://maven.apache.org/SETTINGS/1.0.0"
      xmlns:xsi="http://www.w3.org/2001/XMLSchema-instance"
      xsi:schemaLocation="http://maven.apache.org/SETTINGS/1.0.0
                          https://maven.apache.org/xsd/settings-1.0.0.xsd">
    <profiles>
      <profile>
        <id>set-ma-home</id>
        <properties>
        <MA_HOME>Path to your /git/infiniteautomation/ma-core-public/Core folder</MA_HOME>
        </properties>
      </profile>
    </profiles>
    <activeProfiles>
        <activeProfile>set-ma-home</activeProfile>
    </activeProfiles>
</settings>
Import Core Projects
Import all the projects from the ma-core-public repository. Note that references to private repository projects should be resolved automatically when Eclipse downloads the dependencies from the remote Maven repositories.
- Select: Window → Show View → Other... → Git Repositories
- Select: Clone a Git Repository from URI
- Check: Import all projects when clone finishes
- Refer to Appendix A to ensure you have the Push configured properly
Tip: keep your repositories organized by creating your local repository in the following folder structure. /{some path}/git/infiniteautomation/ma-core-public
The default branch is main and is where the latest Mango core development happens. After all the projects are imported Eclipse will do its first build and download all the required Maven dependencies automatically. When this finishes you are ready for the next step.
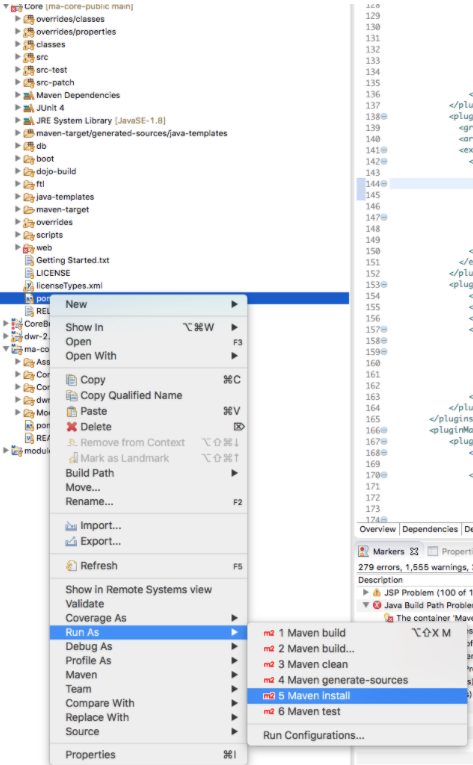
Note 1: Check the Markers tab to see if any Build problems occured. If so you may need to Right Click on some of the projects and Maven → Update Project… for any projects with problems.
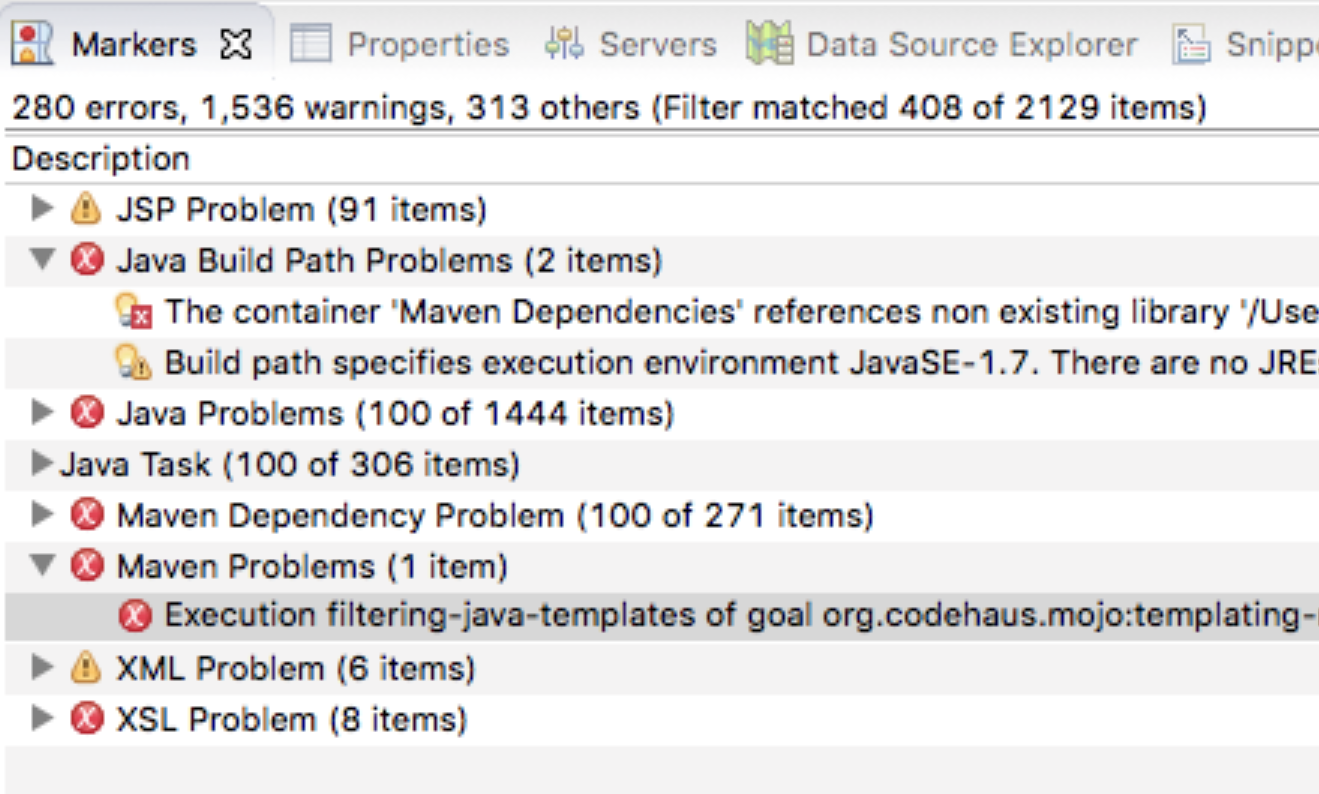
Note 2: If the CoreBundle project has Java Build Path Problems, you may need to perform a Maven Install on the Core project. In that case right click on the Core/pom.xml file and Run As → Maven Install. Then Maven → Update Project on the CoreBundle project
Copy Overrides
Make a copy of the env.properties file (from classes/env.properties) into the overrides/properties folder so you can make edits for your local instance. Also copy the debug-log4j2.xml file into the overrides/classes folder. This way you can modify them to suit your needs and they are automatically ignored by git.
Debug Mango Core
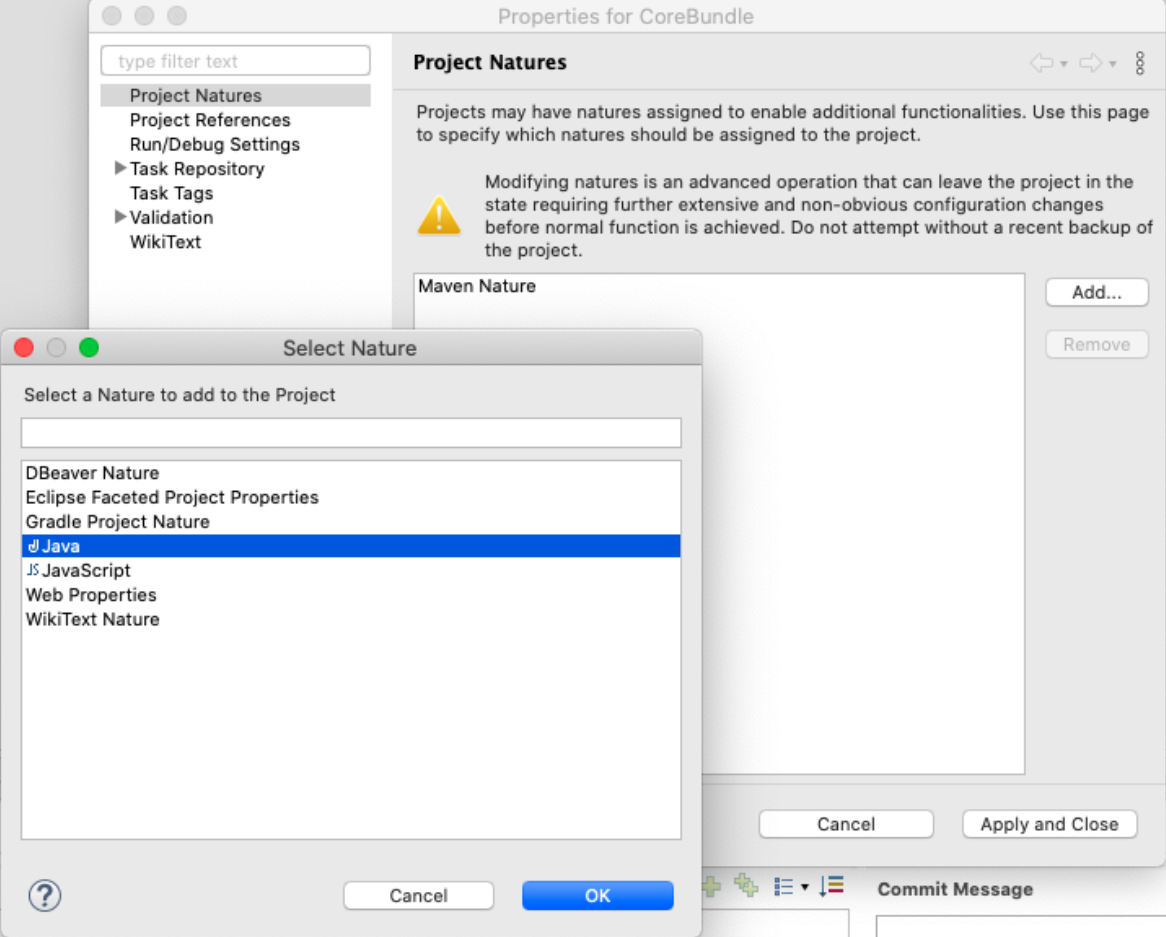
Add the Java Nature to the CoreBundle Project
Since there is no source code in the CoreBundle project Eclipse will not detect that it can be run. To help Eclipse you need to add the Java Nature. Right click on the CoreBundle project and choose properties.
From the CoreBundle project, select Run → Debug Configurations and create a new Java Application Debug Configuration as shown:
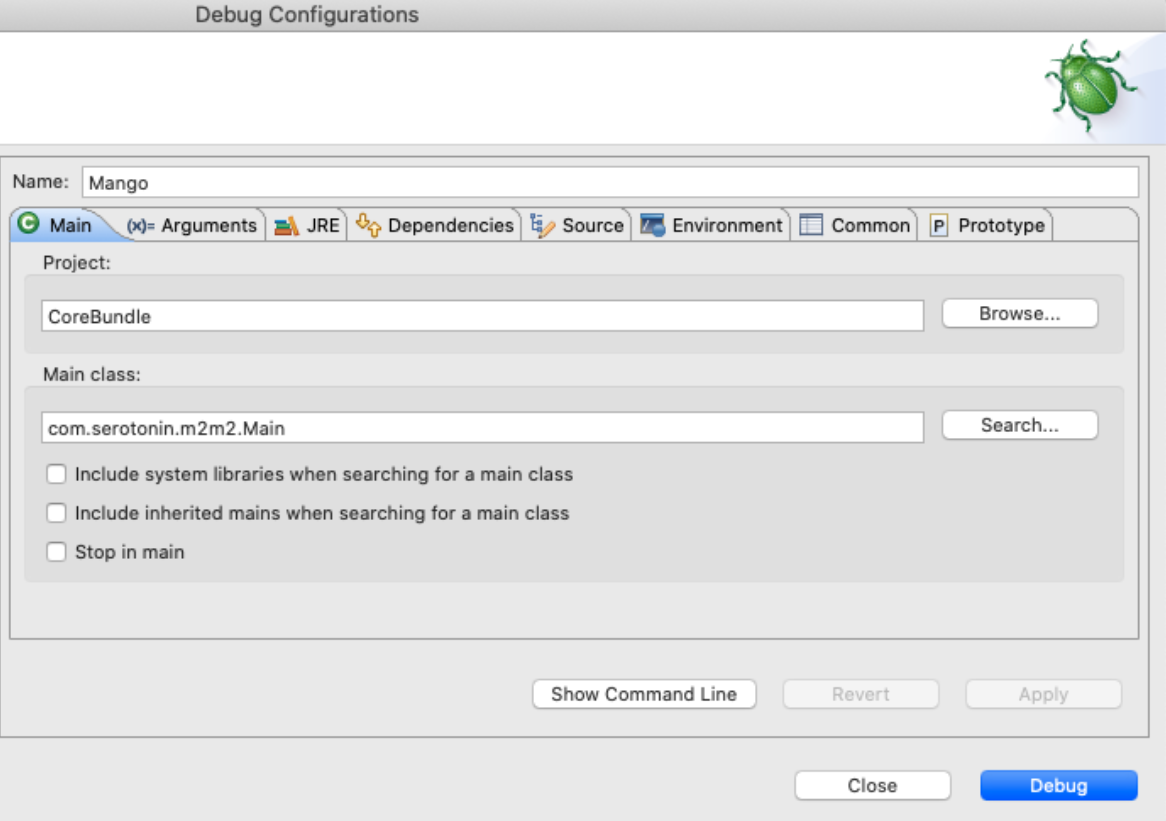
Configure the VM Arguments on the Arguments Tab as follows:
-server
-Xmx8G
-Xms8G
-Dma.home=/path/to/git/infiniteautomation/ma-core-public/Core
-Dlog4j.configurationFile=file:/path/to/git/infiniteautomation/ma-core-public/Core/overrides/classes/debug-log4j2.xml
Configure the Classpath as follows by adding these folders from the Core project. On the Dependencies tab, select the Classpath Entries row and click the Advanced button. Then select Add Folders and add these 3 folders from the Core project
/Core/overrides/classes
/Core/overrides/properties
/Core/classes

To start Mango click the ‘Debug’ button.
Note: The log4j configuration file is referenced from the overrides folder that you copied into before
Note 2: If you don’t see a com.serotonin.m2m2.Main class, you may need to do a Maven install of the core project, then right click on the CoreBundle in the package explorer and Maven → Update Project. You may need to run the Maven install again afterwards.
Install the Virtual Data Source
- Clone the ma-modules-public repository by adding a new repository to Eclipse using this URL
- Check Import existing projects into workspace
- It is always a good idea to keep your repositories organized i.e. in a folder structure similar to infiniteautomation/ma-modules-public
- Refer to Appendix A to ensure you have the Push configured properly
There is a maven profile to use when building modules install-module. The install-module profile will build a zip of the module and install into the MA_HOME directory defined in your settings.xml file, install-module should only be done when Mango is not running.
Right click on the Virtual Data Source’s pom.xml file and select Maven Build… Configure the settings as shown below and click Run to build the module.
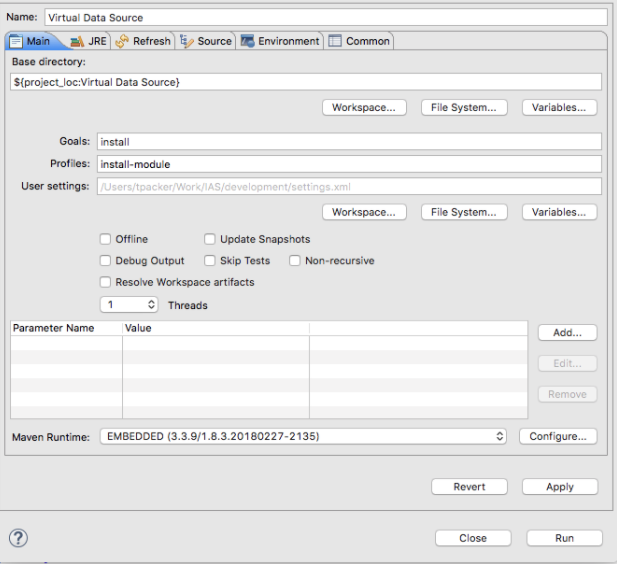
When you start Mango should see a log output that has Installing module virtualDS
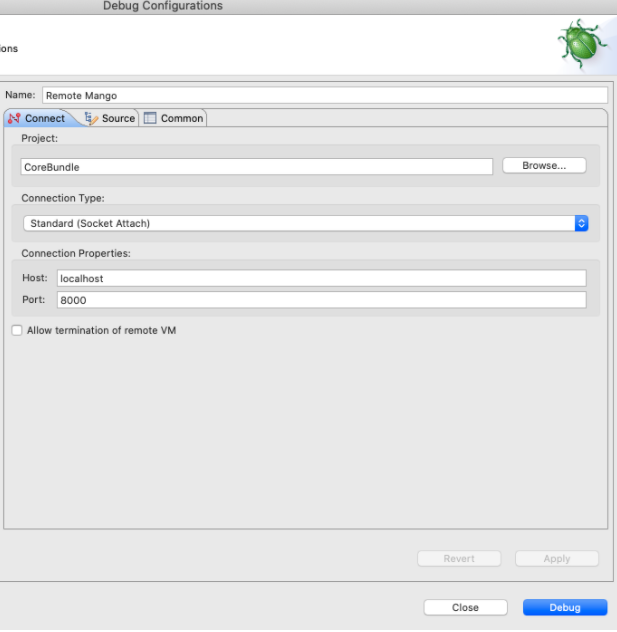
Remote Debugging the Mango Core
Mango can be remotely debugging by Eclipse if started with the correct parameters. Start Mango with these VM arguments:
-Xrunjdwp:transport=dt_socket,address=8000,server=y,suspend=n
The suspend option of y will wait for the debugger to connect before starting Mango. Otherwise Mango will start and you can connect the debugger at any time.
To connect to a Mango started in debugging mode Add a Remote Application run configuration as follows:
REST API test development
The REST api should have tests written for all endpoints using the node-mango-client written in node.js. The project can be found here When checking out the code place it into the folder structure at the same level as your core and module repos.
Tests should be placed into the api-test folder in the root of the module. The tests will look for a file named config.json in the root of the module running the tests. The contents are as follows:
{
	"protocol": "https",
    "host": "localhost",
    "port": "8443",
    "rejectUnauthorized": false,
	"corsTestAllowedOrigin":"http://localhost:8080"
}
You need to install mocha to run the tests if you are adding tests for the first time. To do that run: yarn install
Tests can be executed against a running Mango in a few ways.
- To execute all tests:
yarn mocha **/api-test/*.spec.js - To execute matching suite(s) or test(s):
yarn mocha **/api-test/*.spec.js --grep="pattern to match” - To execute all tests for all modules, from the node-mango-client directory execute:
NODE_PATH=node_modules yarn run mocha ../*/*/api-test/*.spec.js
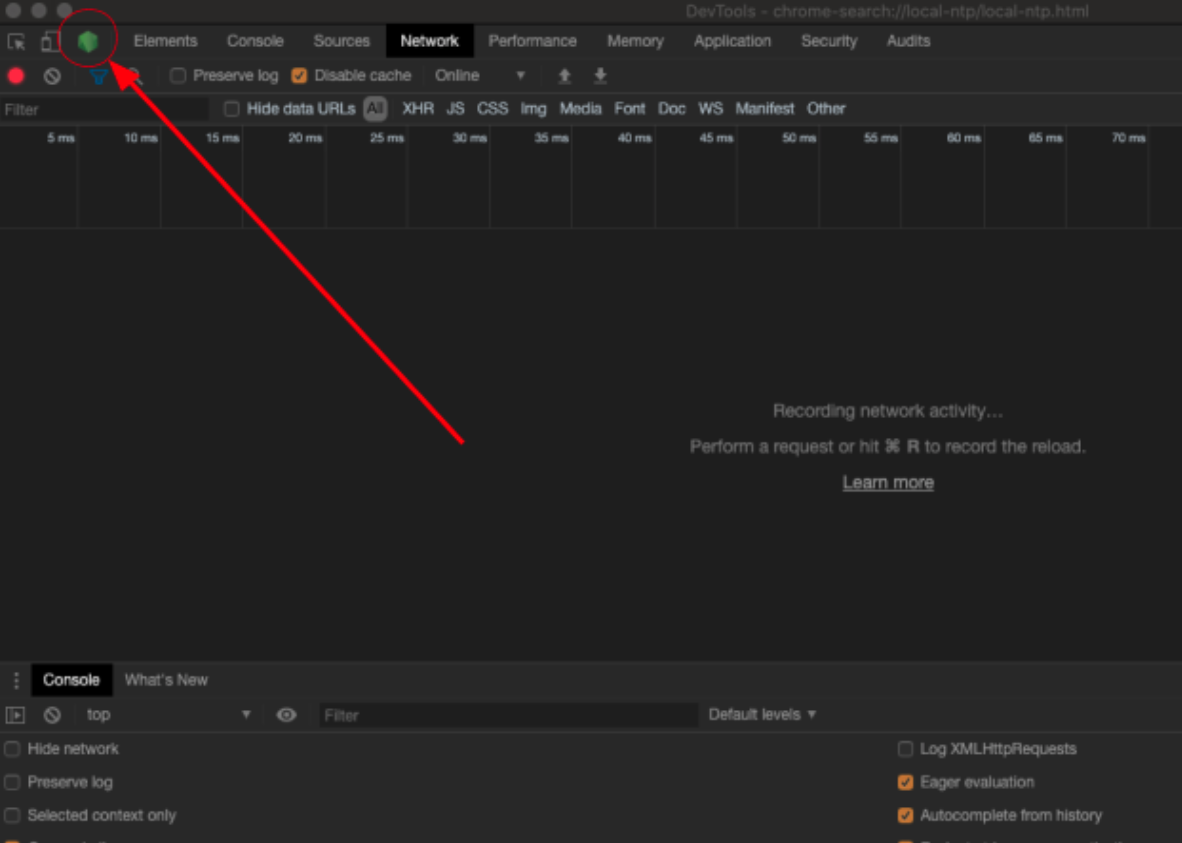
Debugging
To debug a NodeJS test add --inspect-brk to the command and open Chrome developer tools. In the toolbar open the NodeJS icon to show the debugger. To easily find the location in the code where you want to start debugging it helps to put the command debugger; into the source before running the test.
Node Mango client development
When writing tests it may be necessary to update the client code. After checking out the client project and modifying the source you can install it locally by executing the following in the node-mango-client root (or mango-module-tools) directory:
yarn link
And then adding this to any module while developing by executing the following in the root of the module’s directory:
yarn link “@infinite-automation/mango-client”
yarn link “@infinite-automation/mango-module-tools”
Web development
HTML5 UI
The HTML5 UI is enabled by installing the MangoUI module. This code is located in this repository ma-dashboards. Checkout this code and install the module using a similar procedure to the Virtual Data source described above.
General Information
Most Mango modules contain a web-src folder which contains JavaScript and HTML files which are bundled into the web folder using webpack during the module compilation process.
When working on the web project you probably want to run Webpack using development mode so you can debug your JavaScript files in your web browser. To do this you can add a parameter to the Maven build dialog in Eclipse (shown above). Click “Add” and add a parameter named webpack.mode with value development.
You can set this via the command line by adding -Dwebpack.mode=development after your mvn install command.
Automatic recompilation of web-src files
Another helpful thing to use while working on the web projects is automatic recompilation (Webpack) of web-src files. You can do this by running yarn run webpack --mode development --watch from the project root. Whenever you change a file in web-src, the bundled JavaScript files in web will be updated.
To make your life even easier so you can just hit F5 and refresh for changes, create a symbolic link from your running Mango’s $MA_HOME/web/modules/$MODULE_NAME/web folder to your development directory. e.g. on Linux run ln -s $DEV_ROOT/ma-dashboards/UI/web $MA_HOME/web/modules/mangoUI/web Equivalent commands exist on OSX (ln command with slightly different syntax) and Windows (mklink command).
Note that if you reinstall the module using Maven or from a zip file, you will need to recreate your symbolic link after Mango unpacks the zip file.
Note: Mango 3.7 has a development mode that automates the process of creating the symbolic link for your web directory. See section below.
Appendix A - Eclipse General Settings
Setup Java Code Templates
Add default templates for comments on all new files and types.
Setup Comments for new Files
/**
 * Copyright (C) ${currentDate:date('yyyy')}  Infinite Automation Software. All rights reserved.
 */
Setup the File template with a comment for every file with the Copyright information as shown:
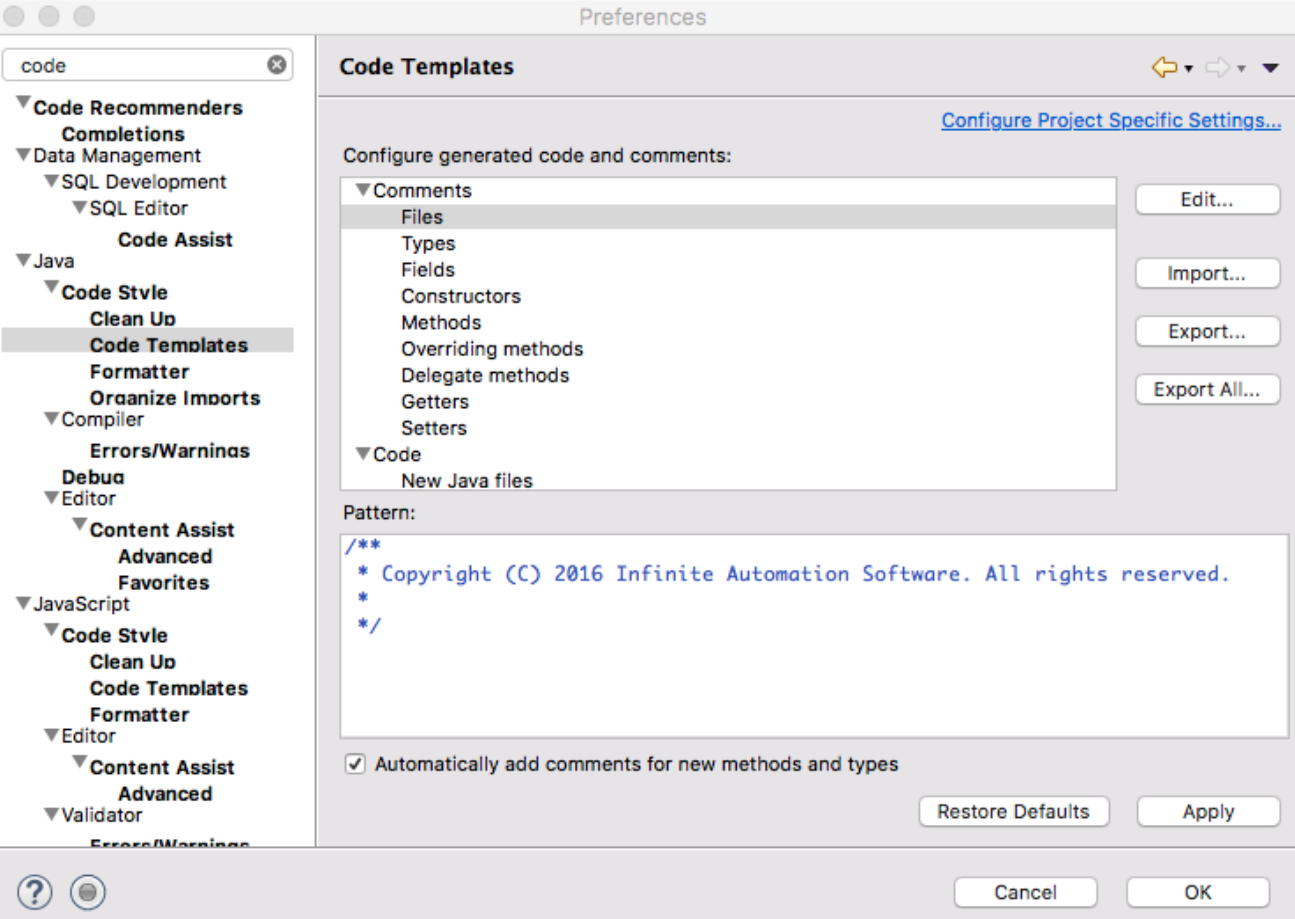
Be sure to check the ‘Automatically add comments for new methods and types’ checkbox.
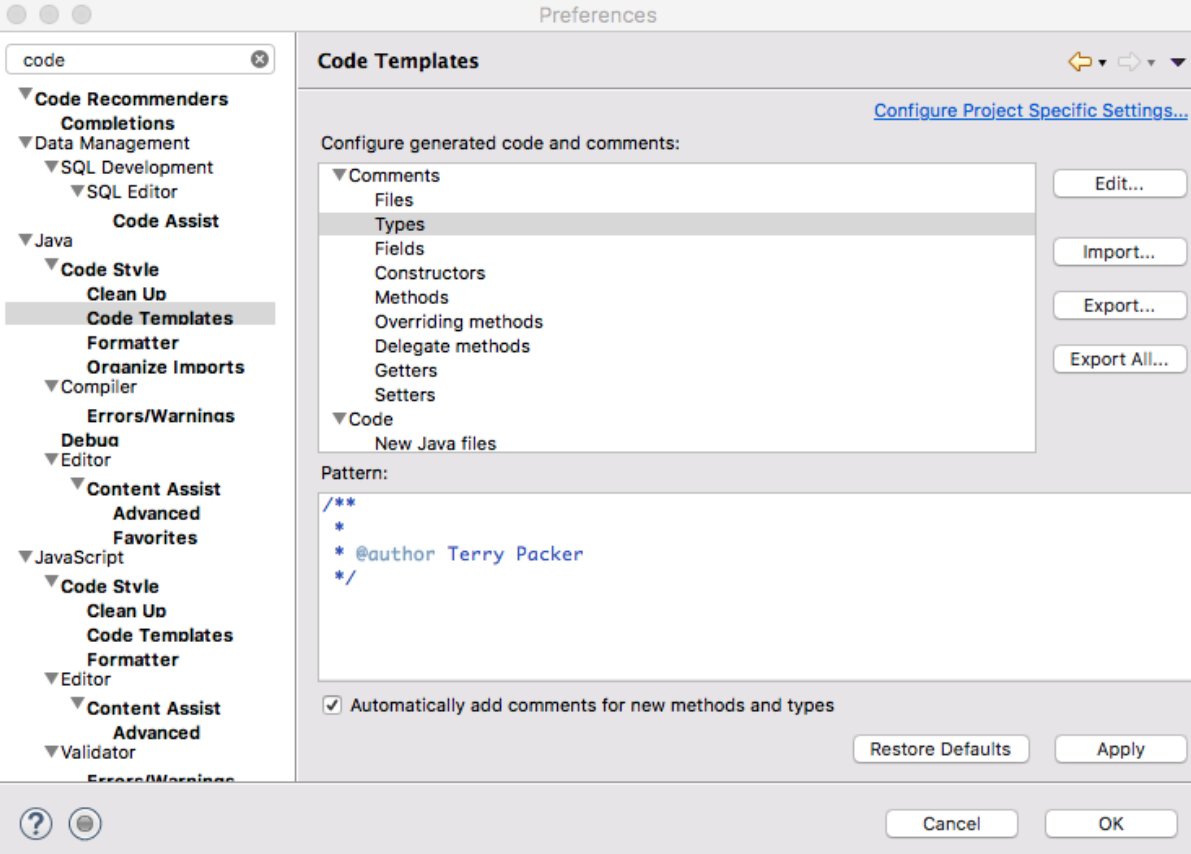
Setup Comments for New Types
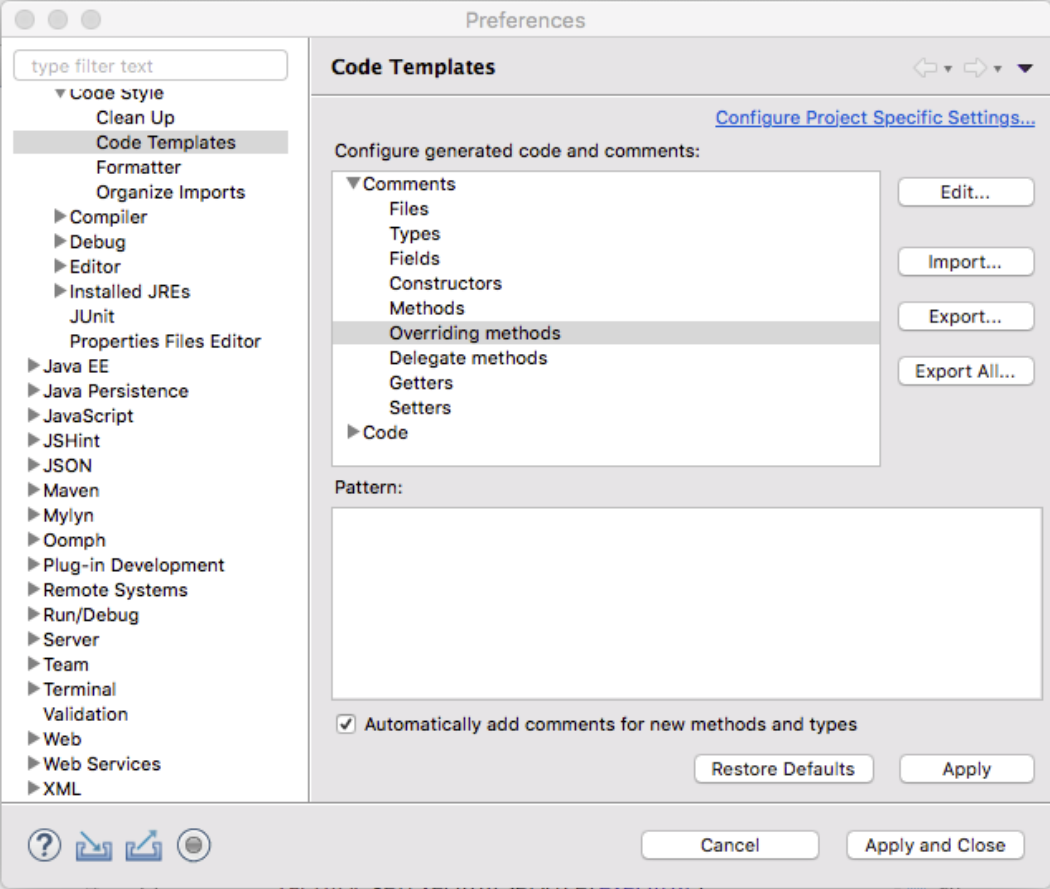
Remove Non-Javadoc for Overrides
Be sure to remove the comments for the overrides, the default is a non-javadoc comment.
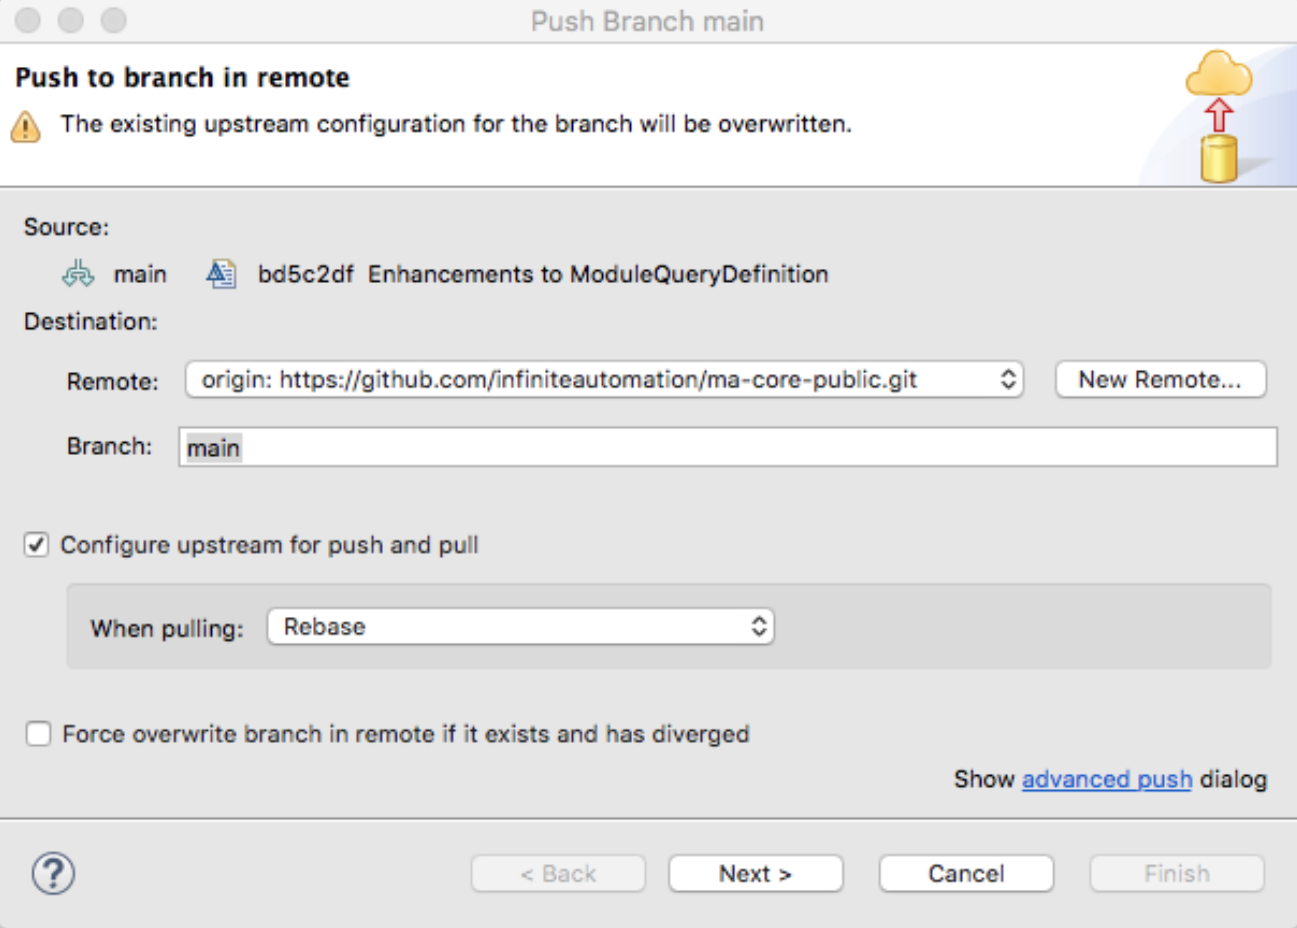
Properly Configure Maven Push
Choose: Switch to the desired branch main and be sure to configure the branch for rebasing of commits rather than merging in the Configure upstream for push and pull. This can also be done at any point by right clicking on the project and selecting Team… → Push to branch ‘...’.
Debug Tools
MAT - Memory Analyzer Tool
Very useful to explore heap dumps and identify Memory usage/leaks. Check here
This tool integrates nicely into eclipse using the update site
Development Mode (Mango 3.7+)
Mango can be placed into development mode to simplify development.
At startup mango will load the class files from your development environment instead of the jar files for the modules and create links between the module’s web folder in your development tree and the MA_HOME/web/modules/<your-module>/web folder. You can then run the webpack build to pick up changes in your development web folder, e.g. yarn run webpack --mode development --watch.
You must first install a module once before it will work. By default all modules will be loaded in development mode unless the whitelist/blacklist options are set.
# Overall enable of development mode, may be used to turn on other development features in modules
development.enabled=true
# Development home directory, i.e. the directory where all your git repositories are checked out
development.home=C:\\Users\\Jared\\mango-root
# Directories in which to look for modules, resolved relative to development.home. You can also use absolute paths. (comma separated)
development.moduleDirectories=ma-dashboards,ma-modules-private,ma-modules-proprietary,ma-modules-public
# Skip the persisting of paths inside the module web directory (defined in module.properties as persistPaths) (DOES NOT APPLY TO Mango versions >=3.8.x)
development.skipPersist=true
# Creates a symbolic link from ${MA_HOME}/web/modules/${moduleName}/web to module dev directory web
development.linkWeb=true
# Creates a symbolic link from ${MA_HOME}/web/modules/${moduleName}/resources to module dev directory resources
development.linkResources=true
# Adds the development classes directory to the module's classpath (i.e. use the i18n.properties files from the development directory)
development.linkClasses=true
# Loads the module's Java classes from the maven-target/classes directory instead of the installed jar file
development.loadMavenClasses=true
# List of module names to whitelist i.e. only link these modules (comma separated)
#development.whitelistModules=
# List of module names to blacklist i.e. do not link these modules (comma separated)
#development.blacklistModules=
Frontend developer settings
A frontend development working on the UI module will want to use settings like this
development.enabled=true
development.home=C:\\Users\\Jared\\mango-mainroot
development.moduleDirectories=ma-dashboards
development.linkWeb=true
development.linkResources=true
development.linkClasses=true
development.loadMavenClasses=false
development.whitelistModules=mangoUI
You will also notice that when development mode is enabled you will have an extra button on your Mango UI toolbar -
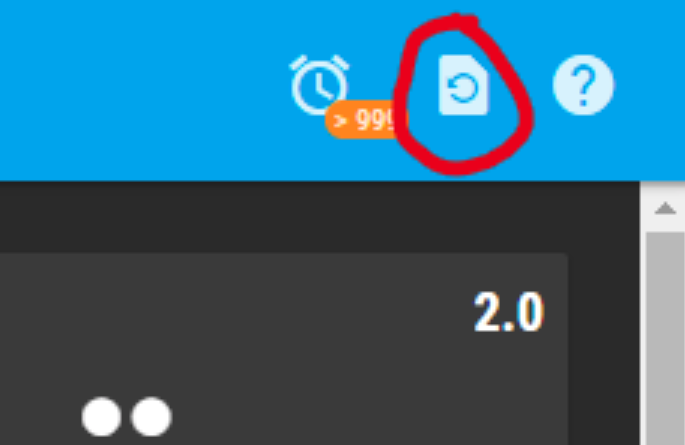
This button will clear the translation cache and reload the page. You can modify a i18n.properties file and then hit this button to see the changes on the page.
Note for Windows developers
If you are on Windows you need to give your development user permission to create links - check here
Summary of effects of enabling development mode
- Java classes and properties files will be loaded from the module's development directory (maven-target/classes)
- A symlink will be created from the installed module directory web to your development directory web
- You can then run webpack in your development directory and see the changes reflected upon page reload
- Any AngularJS module files from SNAPSHOT version modules will be loaded in the browser with a new ?v= parameter every time you refresh the page.This means you should not have to disable your cache and you will still load the latest copy of your files
- Adds button to UI toolbar to clear translation cache (see above)
IntelliJ IDEA setup
- Install IntelliJ IDEA
- Install git (already installed via IntelliJ if on Windows?)
- Install Maven (latest version, 3.x)
- Install JDK 11 LTS
- Run ssh-keygen
- Copy public key (~/.ssh/id_rsa.pub) into Github account
- Configure git
- git config --global user.name "Jared Wiltshire"
- git config --global user.email "jazdw@users.noreply.github.com"
- git config --global branch.autosetuprebase always
- git config --global pull.rebase true
- git config --global core.autocrlf true (Windows only)
- Clone and init submodules
- git clone --recurse-submodules --remote-submodules git@github.com:MangoAutomation/mango-root.git
- cd mango-root
- Alternative steps for clone and init
- git clone git@github.com:MangoAutomation/mango-root.git
- cd mango-root
git submodule update --init --remote <submodules>
- Checkout main branch for all submodules (you can also do this later inside IntelliJ)
- git submodule foreach --recursive "git checkout main"
- Useful commands for working with submodules
- git pull --recurse-submodules
- git submodule update --remote --rebase
- See here
- Open IntelliJ IDEA
- Import mango-root as a project
- Configure IDEA
- Set the project JDK (Chose Java 8 for the language level)
- Increase memory limit (Help, Change memory settings, I used 4096MB)
- Set Maven Thread Count to "1.5C"
- Under Maven..Runner, add a property and set MA_HOME property for Maven to mango-root\ma-core-public\Core
- Open Maven sidebar on right, enable the following profiles in the profiles menu
- core-bundle (Builds a installation bundle zip, including modules)
- core-zip (Builds a core zip, with no modules)
- install-module (Copies built modules to MA_HOME/web/modules)
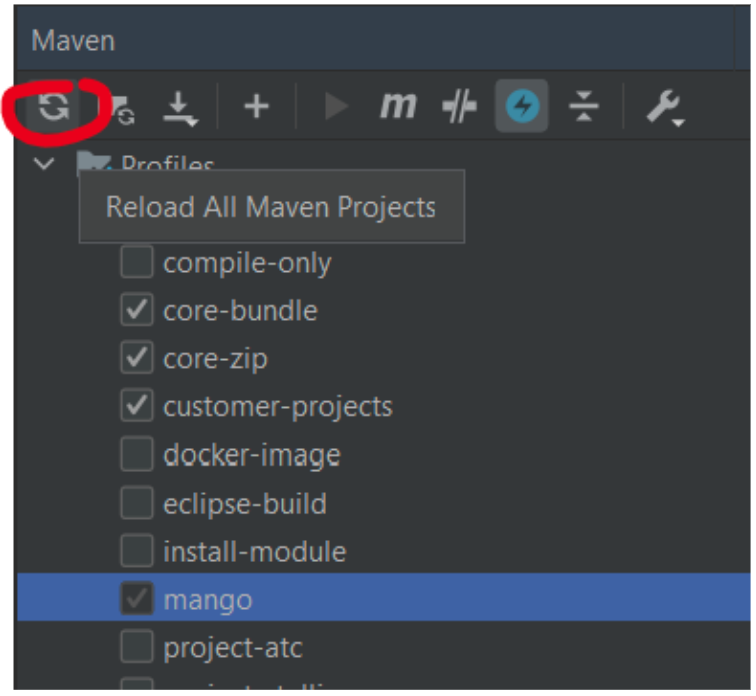
- Reload the maven projects so IntelliJ imports them as modules
- Run mvn install for "All modules and core"
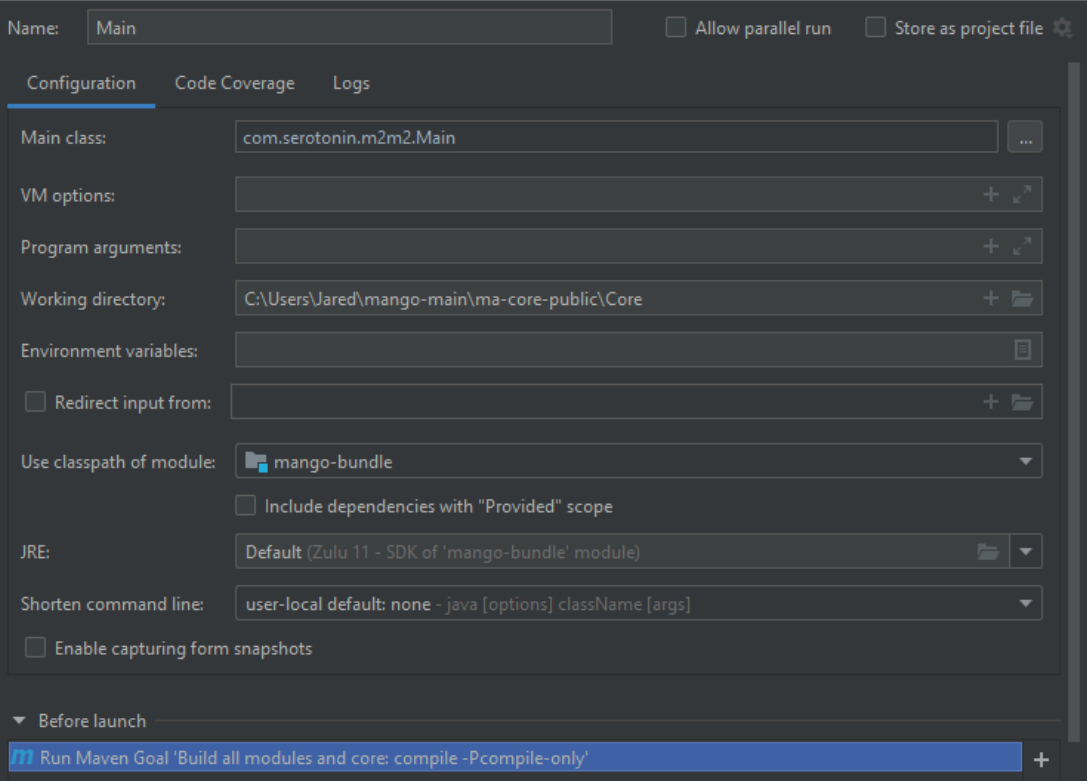
- Create run configuration as follows (working directory is important), you can use the classpath from either mango-bundle or core-zip but core-zip is recommended
New version of IntelliJ
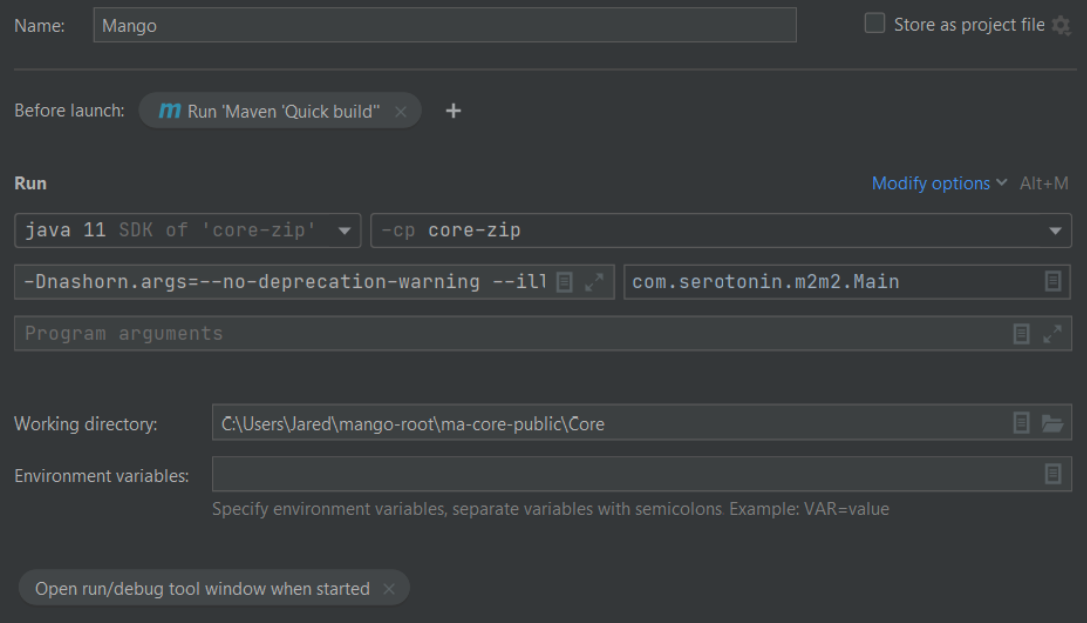
- Before launch build config -
- Create env.properties in ma-core-public/Core/overrides/properties
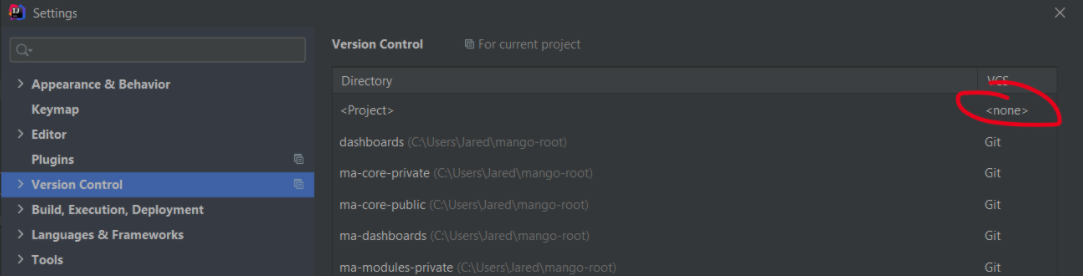
- You may wish to disable VCS tracking on the root repository -
- Enable development mode as per section above (Development Mode)
IntelliJ IDEA frontend setup
- Install yarn classic (v1.x)
- Install NodeJS (LTS version, v14.15.1)
- Edit run configurations
- Edit npm
- Change package manager to yarn
- Right click ma-dashboards/UI/package.json
- Show npm scripts
- Double click webpack goal
IntelliJ IDEA General Settings
- Enable cleaning up of imports
- Preferences->Editor->Auto Import->Optimize Imports on the Fly will automatically remove unused imports
- Use this to match eclipse order: https://stackoverflow.com/questions/14716283/is-it-possible-for-intellij-to-organize-imports-the-same-way-as-in-eclipse
- Code Style: TBD
- Copyright for new files:
- Preferences → Editor → Copyright → Copyright Profiles
/*
* Copyright (C) 2021 RadixIot Software. All rights reserved.
* @Author Your Name
*/
-
Be sure to set the default project copyright to you new copyright
-
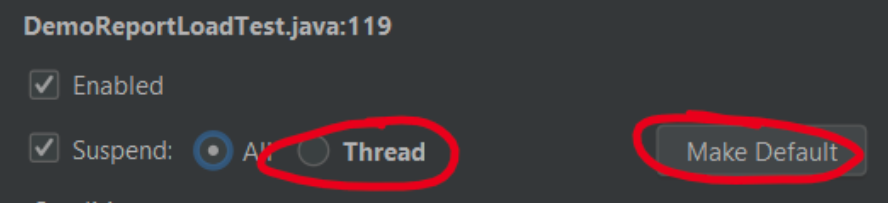
In IntelliJ when you hit a breakpoint, all threads are suspended, you may wish to change this to only suspend the current thread (Eclipse like behavior). Right click a breakpoint and choose "Thread", and "Make Default"
Adding new submodules to mango-root
- git submodule add -b main git@github.com:MangoAutomation/project-xyz.git
- git add .gitmodules project-xyz
- git commit -m "Add submodule"
- git push
- Add profile and module to mango-root pom.xml (copy an existing profile)
- Other users can update their mango-root project via one of:
- git pull --recurse-submodules
- git submodule update --init --remote --rebase
- (Might need to then checkout main branch)
Uploading modules/core to Mango store
There is a Maven plugin which can upload the build zip artifact to the Mango store. You will need to add credentials to your ~/.m2/settings.xml file via a profile, e.g.
<settings>
  <profiles>
    <profile>
      <id>mango</id>
      <properties>
        <mango.store.url>https://teststore.mangoautomation.net</mango.store.url>
        <mango.store.username>username@example.com</mango.store.username>
        <mango.store.password>yourpassword</mango.store.password>
      </properties>
    </profile>
  </profiles>
  <activeProfiles>
    <activeProfile>mango</activeProfile>
  </activeProfiles>
</settings>
- To upload to the store run mvn deploy -Pstore-upload from any module or parent project
- You may wish to skip deployment to Nexus using
-Dmaven.deploy.skip
Uploading 3rd Party Jars to Radix Maven Repository
You will need to add the server and credentials to your ~/.m2/settings.xml file, e.g.
<servers>
	<server>
    	<id>ias-snapshots</id>
        <username>ias-jenkins</username>
        <password>xxxx</password>
    </server>
    <server>
    	<id>ias-releases</id>
        <username>ias-jenkins</username>
        <password>xxxx</password>
    </server>
</servers>
For Maven 3 use the following:
mvn clean deploy -DaltDeploymentRepository=ias-releases::https://maven.mangoautomation.net/repository/ias-release/
For Maven 2 use the following:
mvn clean deploy -DaltDeploymentRepository=ias-releases::default::https://maven.mangoautomation.net/repository/ias-release/
Script to build Mango
#!/bin/bash
RED="\033[1;31m"
GREEN="\033[1;32m"
NOCOLOR="\033[0m"
MA_DEV_DIR="/<YOUR_PATH>/git.nosync/infiniteautomation"
MA_HOME="/<YOUR_PATH>/mango-nightly-build.nosync"
# Build mango
function build-mango() {
    find "$MA_DEV_DIR" -name "ma-*" -mindepth 1 -maxdepth 1 -type d -print -exec git -C {} checkout main \;
    echo -e "${GREEN}CHECKED OUT ALL MAIN BRANCHES${NOCOLOR}"
    find "$MA_DEV_DIR" -name "ma-*" -mindepth 1 -maxdepth 1 -type d -print -exec git -C {} pull \;
    echo -e "${GREEN}PULLED ALL REPOS${NOCOLOR}"
    cd "$MA_DEV_DIR"/ma-core-public
    echo -e "${GREEN}READY TO BUILD MANGO ...${NOCOLOR}"
    mvn install --settings=/Users/ppuccinir/.m2/settings.xml -Pma-modules-public,ma-modules-private,ma-modules-proprietary,ma-dashboards,core-zip -DskipTests=true
    cp "$MA_DEV_DIR"/ma-core-public/CoreBundle/maven-target/m2m2-core-4.0.0-SNAPSHOT.zip "$MA_HOME"
    echo -e "${GREEN}COPIED ZIP TO MANGO HOME${NOCOLOR}"
    echo -e "${GREEN}READY TO INITIALIZE MANGO ...${NOCOLOR}"
    "$MA_HOME"/bin/start-mango.sh
    cd "$MA_HOME"/bin
}
# Start mango
function start-mango() {
    cd "$MA_HOME"/bin
    ./start-mango.sh
}
# Stop mango
function stop-mango() {
    cd "$MA_HOME"/bin
    ./stop-mango.sh
}
Then, run:
source /<SCRIPT_PATH>/.custom_bash_commands.sh
source /<YOUR_PATH>/.zshrc